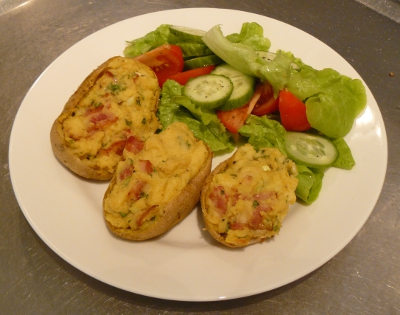
Eight Bells

If you enjoy this blog please leave a comment, if there is something you would like to see feel free to make a request and don't forget to use the search function.

Saturday, May 29, 2010

Yummy Potato Skins

This delicious potato skins recipe is loosely based on a recipe from the delicious Nigella Lawson's "Nigella Christmas" and is a great way to use up the potato skins you had left over from your baked potato gnocchi. I'll present the recipe here as if you are starting from scratch, if you have left over skins just boil a few potatoes to give you enough for your filling. Nigella's recipe makes 20 potato skins, if you're using leftovers just over fill your skins because you won't have 20, you'll more likely have 10 or 12, I hope that all makes sense.


Potato Skins

10 baking potatoes
225g tasty cheddar cheese
125ml sour cream
6 fresh chives (or fresh parsley)
4 spring onions
1 tablespoon of Dijon mustard
1/4 teaspoon smoked paprika
1/2 teaspoon salt
Fresh black pepper
1 teaspoon worcestershire sauce
6 rashers streaky bacon
oil

Bake your potatoes at 180C for around 1 1/2 hours until the insides are completely soft and the skins starting to wrinkle and go slightly crispy, this is best done the day before you intend serving this meal.
Cut the potatoes in half lengthways and when they are cool enough to handle, scoop the insides into a large bowl and leave the skins to cool, refrigerate if not using the same day. When the potato has cooled down a little pass it through a ricer or mash and stir in a splash of olive oil.
When you are ready to fill the potatoes, preheat your oven to 160C. Chop up the bacon into 1-2cm pieces and cook until crispy. Grate the cheese and add it to the potato along with the sour cream and mustard. Finely chop the spring onions and chives and add to the potato along with the worcestershire sauce, cooked bacon, paprika and salt and pepper. Mix well and fill your potato skins.
Bake at 160C for around 40-50 minutes until heated through and starting to crisp up, serve with fresh salad or what you will.

Tuesday, May 25, 2010

The Chicken or the Egg

Which came first, the chicken or the egg?
If you've ever been presented with this question and found it far too deep a scientific and/or philosophical conundrum to confidently answer correctly, you can cut that silly nonsense out right now, the answer is, the egg. In our case, of course, the reverse is true, the chickens arrived about a month ago and the first egg arrived yesterday.

Designing and building the chicken palace and then meeting the chickens for the first time and having them move in was great fun but it was nothing compared to the excitement of opening up the chicken coop yesterday and finding our first egg! I haven't yet figured out which chicken is our little overachiever but hopefully they will all follow her example quite soon, there was another egg there today!

The egg was summarily executed by being immersed in boiling oil for four minutes and then eaten, a first egg sacrificial offering to the egg gods if you will, it was delicious.

The Palace


The Ladies


The Egg

Monday, May 24, 2010

Potato Gnocchi

Almost all potato gnocchi recipes will tell you to steam your potatoes, don't, the secret to successful and great tasting gnocchi is baking your potatoes.
For best results a potato ricer should be used but you can get excellent results mashing your potatoes. The real trick with gnocchi is, don't be scared to have a go at it, it will probably take two or three attempts to get perfect, fluffy, soft, delcious, pillows of gnocchi.


Potato Gnocchi

1.2kg baking potatoes
200g flour
1 egg, lightly beaten
salt

Heat your oven to 170C and bake your potatoes until well cooked and soft all the way through in around 1 1/2 hours.
Remove potatoes from the oven, slice in two length ways and leave to cool down until you can handle them without burning yourself but they are still hot.
Scoop out your potatoes and pass through a ricer into a large bowl or mash well but gently. Refrigerate the potato skins, I will have a delicious potato skins recipe for you in a couple of days.
Stir in the flour, egg and a couple of pinches of salt and mix well until you have a stiff uniform dough then turn out onto a flat surface. Cut off about 1/5 of the dough and using the palms of your hands roll into long thin rolls about 1 1/2 cm thick then cut into 2cm lengths and place on a tea towel lightly dusted with flour, continue until you have used all your dough. You can leave the gnocchi like this for an hour or two before cooking if you wish.
When you are ready to eat bring a large pot of lightly salted water to the boil, pick up your gnocchi in the tea towel and dump the whole lot into the boiling water. Very gently stir the water a couple of times during cooking to ensure all the gnocchi cooks and when it has all risen to the surface of the water remove with a slotted spoon or skimmer and serve.

Sauce

Very simple, a can of crushed tomatoes, a finely diced sweet red pepper, cooked streaky bacon and a little Kaitaia Fire, salt and pepper. Heat until slightly reduced and serve over the gnocchi with fresh parmesan.

Friday, May 21, 2010

Jam Doughnut Muffins

For those of you who love a nice warm muffin but also crave a sugary jam doughnut, now you don't have to choose! This recipe will make 12-15 muffins.


Jam Doughnut Muffins

1 3/4 cups flour
1/2 teaspoon salt
1/4 teaspoon cinnamon
3/4 cup sugar
3/4 cup milk
1 1/2 teaspoons baking powder
1/2 teaspoon nutmeg
1/3 cup oil
1 egg
jam (I used raspberry)

Topping

1/2 cup melted butter
1 teaspoon cinnamon
1/4 cup sugar

Preheat your oven to 180C.
In a bowl combine flour, baking powder, salt, nutmeg and cinnamon. In another bowl, using a whisk, thoroughly combine the oil, 3/4 cup of sugar, egg and milk.
Add liquid to dry ingredients and gently fold in with a spatula until combined.
Using a dessert spoon, half fill your muffin tins with batter then using two teaspoons gently drop about a teaspoon of jam on top of the batter then add enough batter to just cover the jam.
Bake at 180C for 20-25 minutes until the tops of the muffins are just starting to turn golden brown.
Remove muffins from the oven and mix 1/4 cup of sugar with 1 teaspoon of cinnamon. Brush the muffins generously with the melted butter then spoon over your sugar and cinnamon mixture until the muffins are coated well.
Eat immediately or heat briefy in a microwave being careful not to over heat as the hot jam can be dangerous. Yum!

Thursday, May 20, 2010

Perfect Breadmaker Burger Buns

Most supermarket burger buns leave a lot to be desired in the flavour and texture department and are often too small for a real Kiwi burger. When you want a burger bun for your 1/4 pound beef patty, steak or whole chicken breast, lettuce, tomato, beetroot, bacon, cheese, pineapple, fried egg, gherkin and onions and you don't want the insides to end up on the outside before going into your insides then these are the buns for you.


Perfect Burger Buns

1 1/2 cups warm water, less two tablespoons
3 1/3 cups white flour
3 tablespoons rice bran oil
2 tablespoons milk powder
2 tablespoons sugar
1 1/4 teaspoons salt
2 teaspoons dry yeast

Place the ingredients in your breadmaker in the order recommended by the manufacturer. Set the machine to dough mode, start.
Lightly grease a sheet of baking paper or lightly coat with cooking spray. After the bread machine has finished making the dough gently punch the dough down so that any large bubbles are gone. Tip the dough out and using a sharp knife, divide into six equal pieces. Form each piece into a ball by gently rolling and passing from hand to hand a few times and then place on the greased baking paper. Press down each ball so it is about 3cm thick and make sure the pieces of dough are at least 5 cm apart.

Cover buns with another sheet of greased baking paper (do not use a tea towel). Put in a warm place (hot water cupboard with cat removed should be fine) until doubled in size in around 40 minutes.
Preheat the oven to 180C. When the dough is ready, remove the top sheet of baking paper and bake in the centre of your pre heated oven until the tops are golden brown and you get a hollow sound when you knock them on their bottoms (lol), this should take around 16-18 minutes.
Place buns on a rack to cool, they are best eaten the same day but will keep well for a day in a sealed plastic bag or bread bin.